Manage Work Orders
Overview
A core function of Maintenance Pro is the creation and management of Work Orders. Work Orders provide a structured method for assigning maintenance tasks to equipment and tracking progress through completion. In most cases, Work Orders are generated to document, manage, and complete maintenance activities efficiently.

The following outlines the standard order of a Work Order:
- Create the Work Order record.
- Add maintenance tasks to the Work Order.
- Assign parts and labor to tasks as required.
- Mark tasks as completed upon completion of work.
- Add relevant notes or attachments to the Work Order record.
- Close the Work Order once all work has been finalized.
Upon completion, all maintenance tasks associated with the Work Order become available within the equipment’s maintenance history.
By default, newly created Work Orders are assigned an Open status. Once work begins and at least one task is completed, the Work Order status automatically updates to In Progress. If completion must be delayed due to pending parts, scheduling constraints, or other circumstances, the optional On Hold status may be applied. When all work has been completed, the Work Order is set to Complete status, and the associated tasks are recorded in the equipment’s maintenance history.
Create New WO Record
Maintenance Pro provides multiple methods for creating a new Work Order record.
From The Work Orders Button On The Left
A plus icon is displayed next to the Work Orders option in the side menu. Selecting the plus icon opens the Work Order creation page.
From The Equipment List
The Equipment List includes a New Work Order button for creating a Work Order. In addition, the equipment action menu provides a New Work Order option.

New Work Order Screen
Using any of the methods described above to create a Work Order will open the New Work Order screen.

- The Equipment field is used to specify the unit associated with the Work Order. This field is automatically populated when a Work Order is created from the home screen or from the equipment action menu.
- The Assignee field designates responsibility for overseeing completion of the Work Order. Up to two assignees may be selected from the employee or vendor lists. Assignment does not determine who performs the labor, as labor entries are added separately to individual tasks and may involve different employees or vendors.
- The Scheduled field may be used to define the planned start date for the Work Order.
- The Due field is used to specify the target completion date for the Work Order.
- A Priority level may be assigned to help distinguish the Work Order from other active tickets.
- A Type may be selected to categorize the Work Order and provide general context regarding its purpose.
- Initial Notes may be added to provide additional details or reference information related to the Work Order.
Add WO Tasks
At the bottom of the New Work Order screen, a list of Soon Due and Overdue maintenance tasks is displayed. Tasks may be selected and added directly to the Work Order. Selecting Add Task creates and adds a new task to the Work Order record.

Any value may be entered into this field. If a matching task already exists, available options will appear as text is entered. New task values can be created directly from this field by selecting the blue Add option.


The typed-in tasks will show up like this:

Selecting Cancel removes a task from the Work Order.
Selecting Save opens the Work Order Detail screen, where parts and labor can be added, the Work Order status can be updated, and additional tasks can be assigned.

Add Parts & Labor
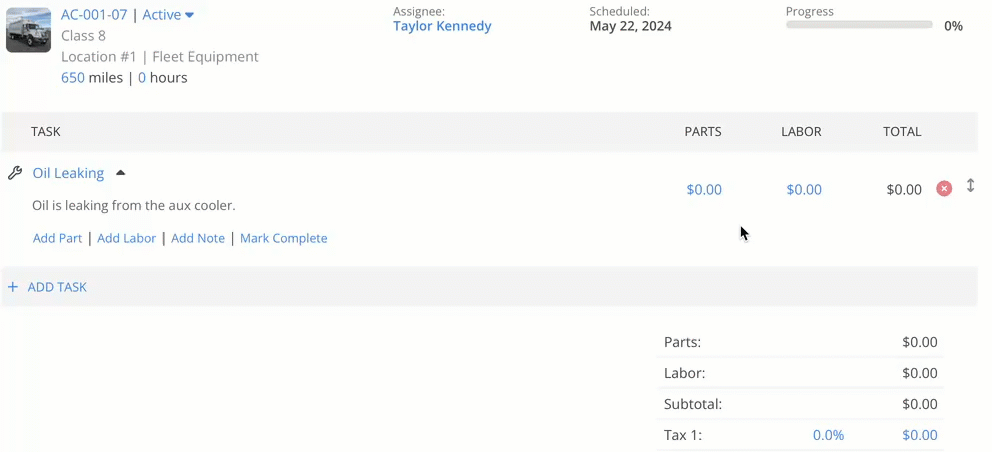
Parts and labor can be assigned to individual Work Order tasks using the Add Parts and Add Labor options located beneath each task.
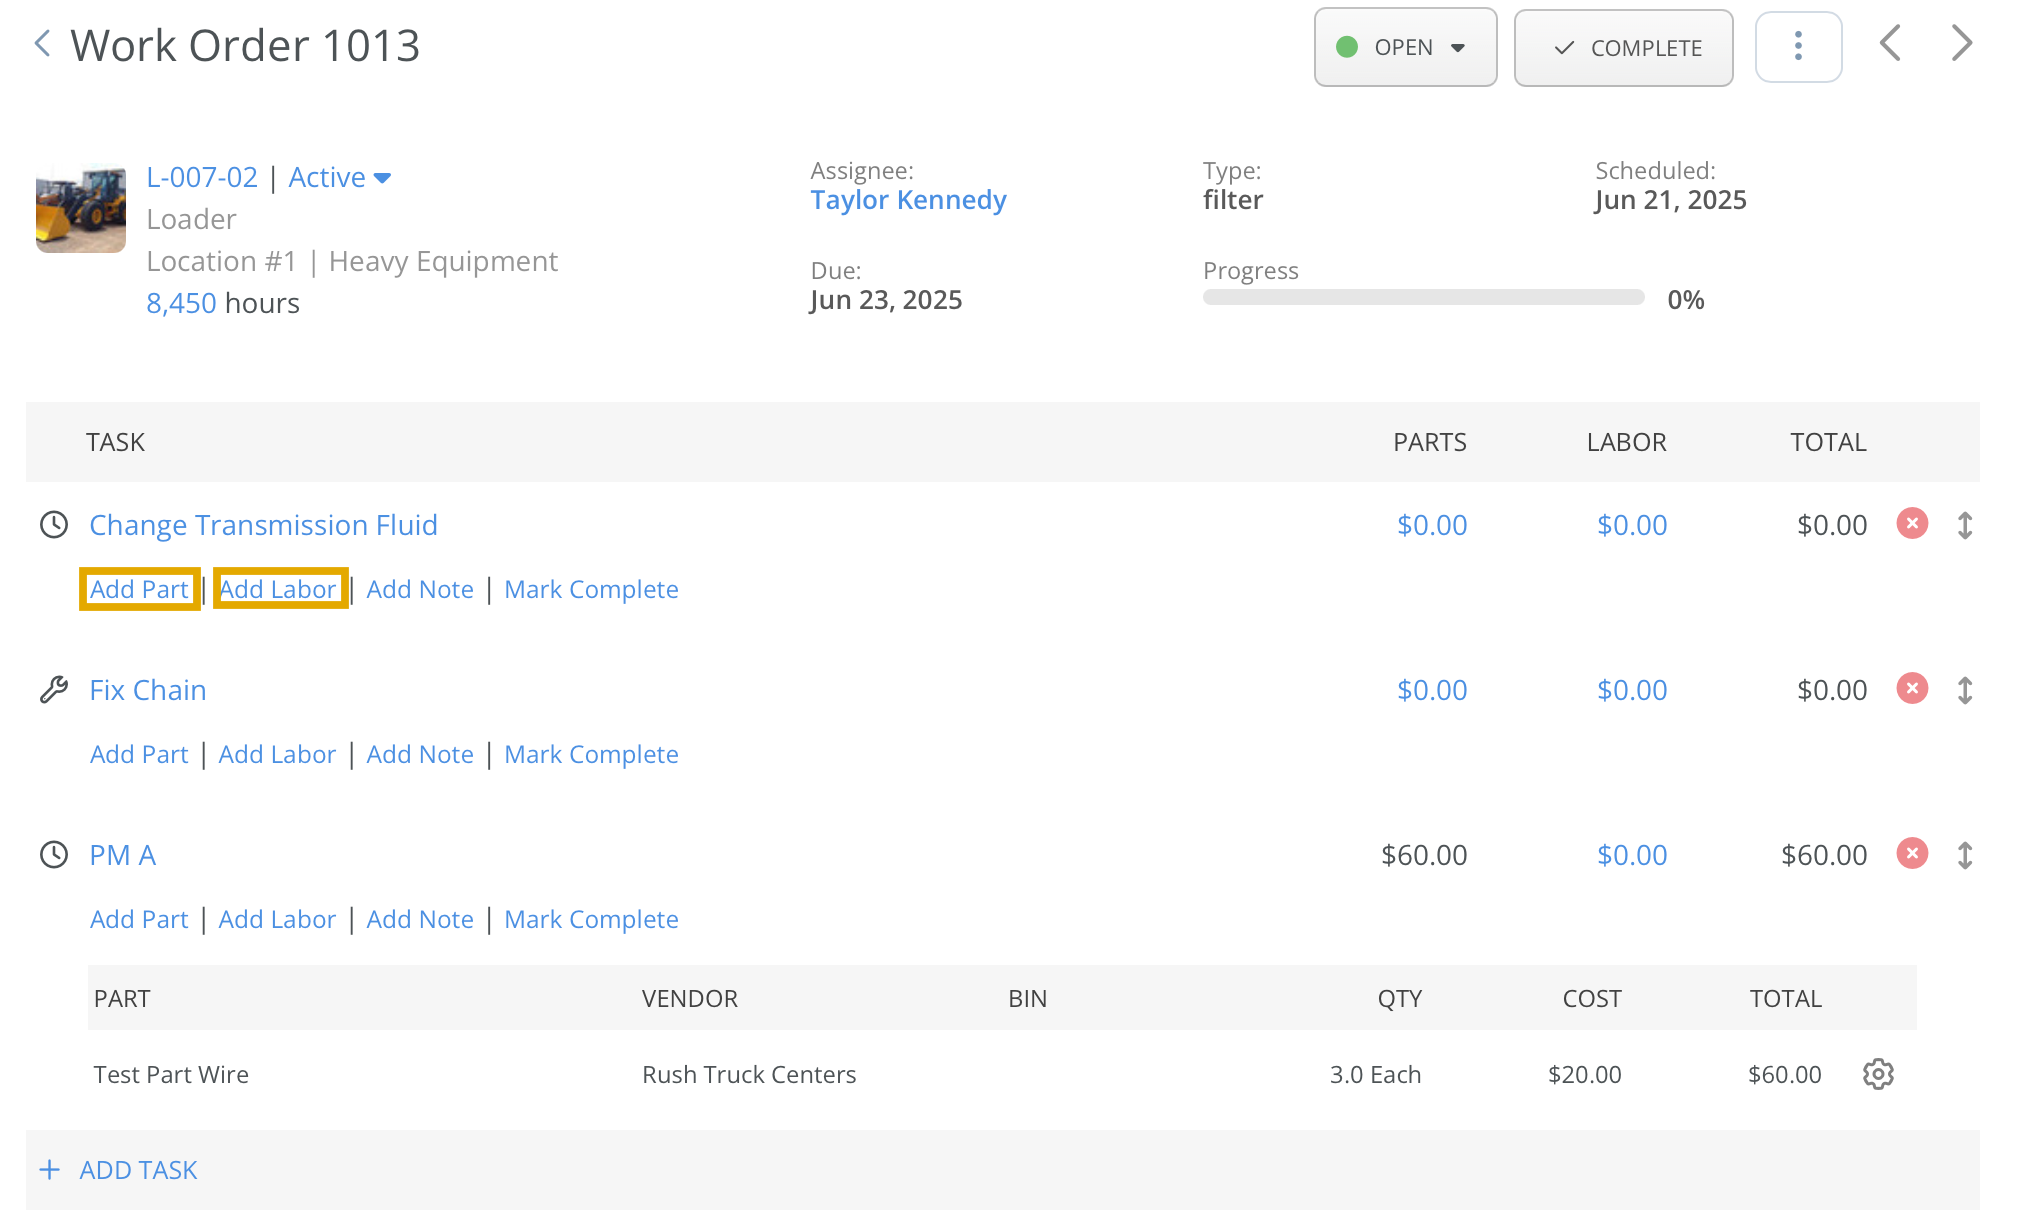
Add Parts
Selecting Add Parts opens an entry form where the Part Number, Quantity, and Cost can be specified.
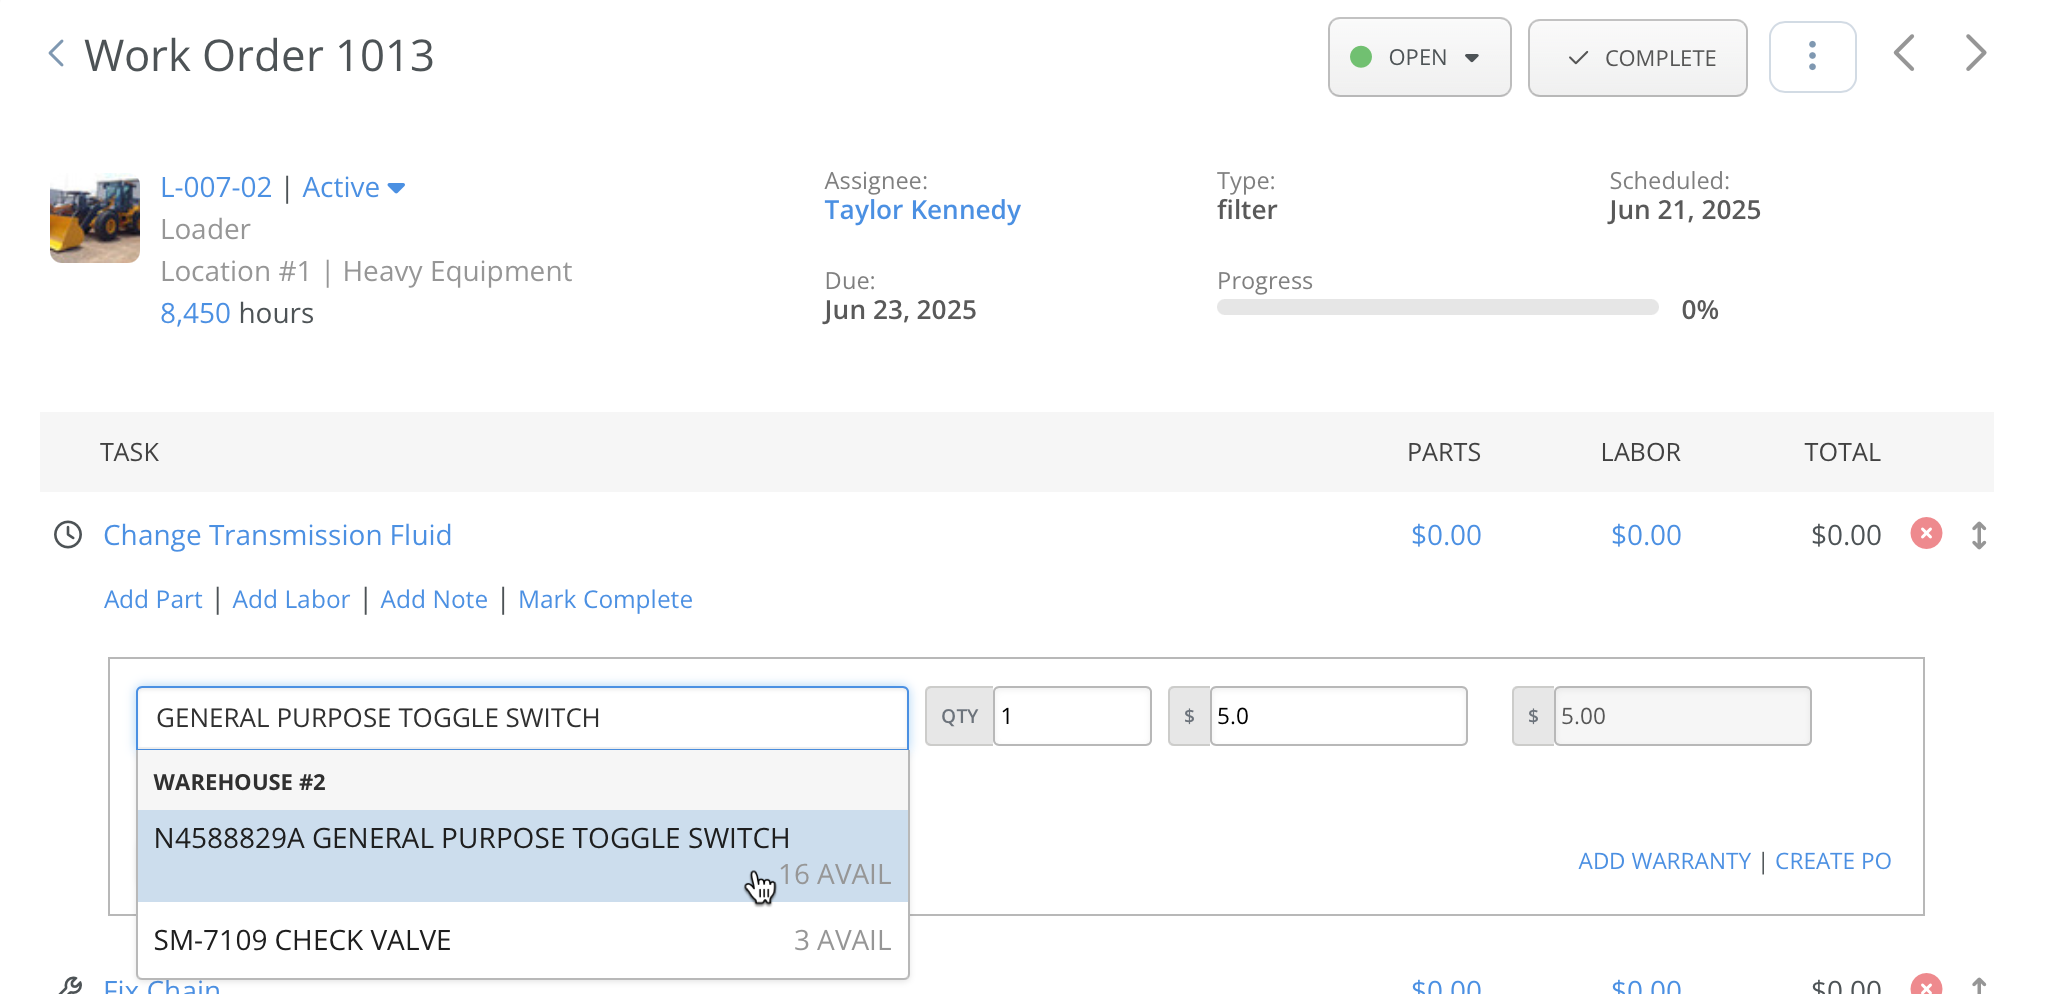
After a quantity is entered, the cost is automatically populated. When inventory tracking is enabled, the system references available Part Receipts associated with the selected part number and calculates the cost based on the applicable receipt records.
- More information about part receipts can be found by clicking here.
Selecting Save attaches the part to the task and provides the option to continue adding additional parts as needed. Selecting Cancel closes the Enter Parts window without adding the entry.
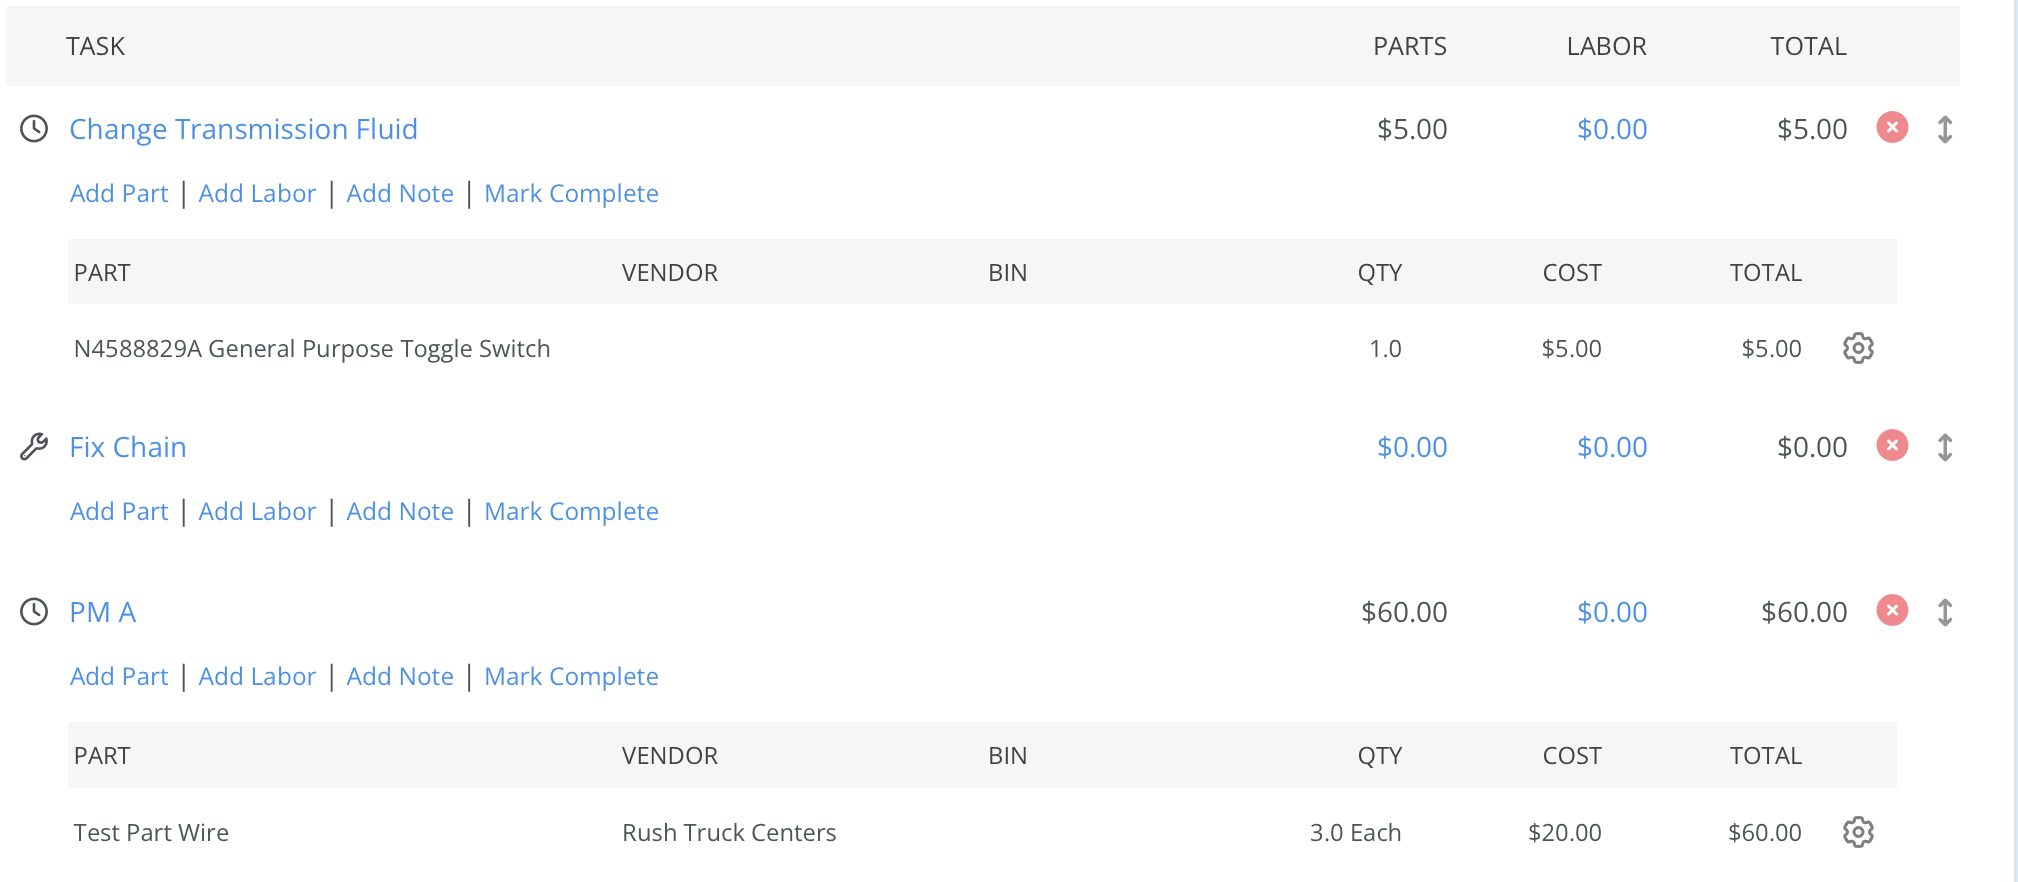
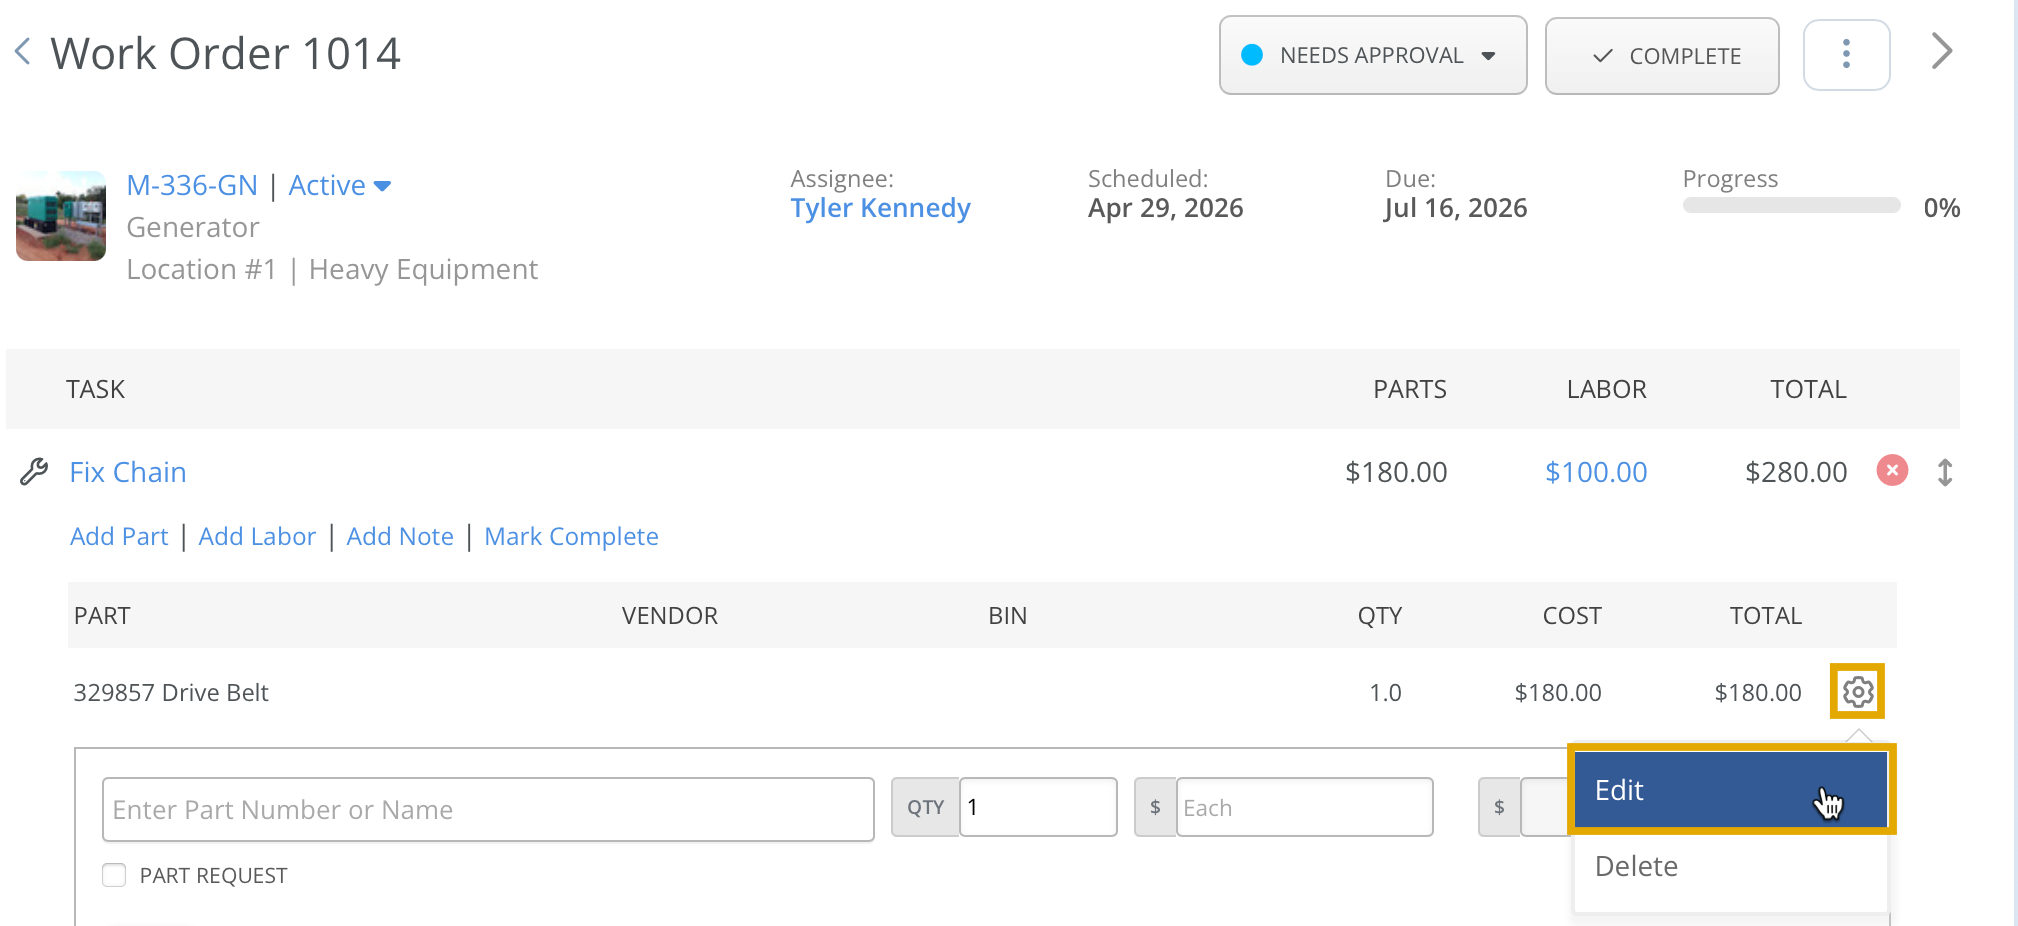
Once a part has been added to a task, the action menu located to the right of the part number provides options to edit or delete the entry.
Add Labor
The process for adding labor closely mirrors the process for adding parts. Select Add Labor beneath the task name to begin.
Enter the employee or vendor responsible for performing the task, then specify the number of hours in the Quantity field. The labor rate is automatically pulled from the employee or vendor profile. If needed, the calculated cost may be adjusted manually before saving.
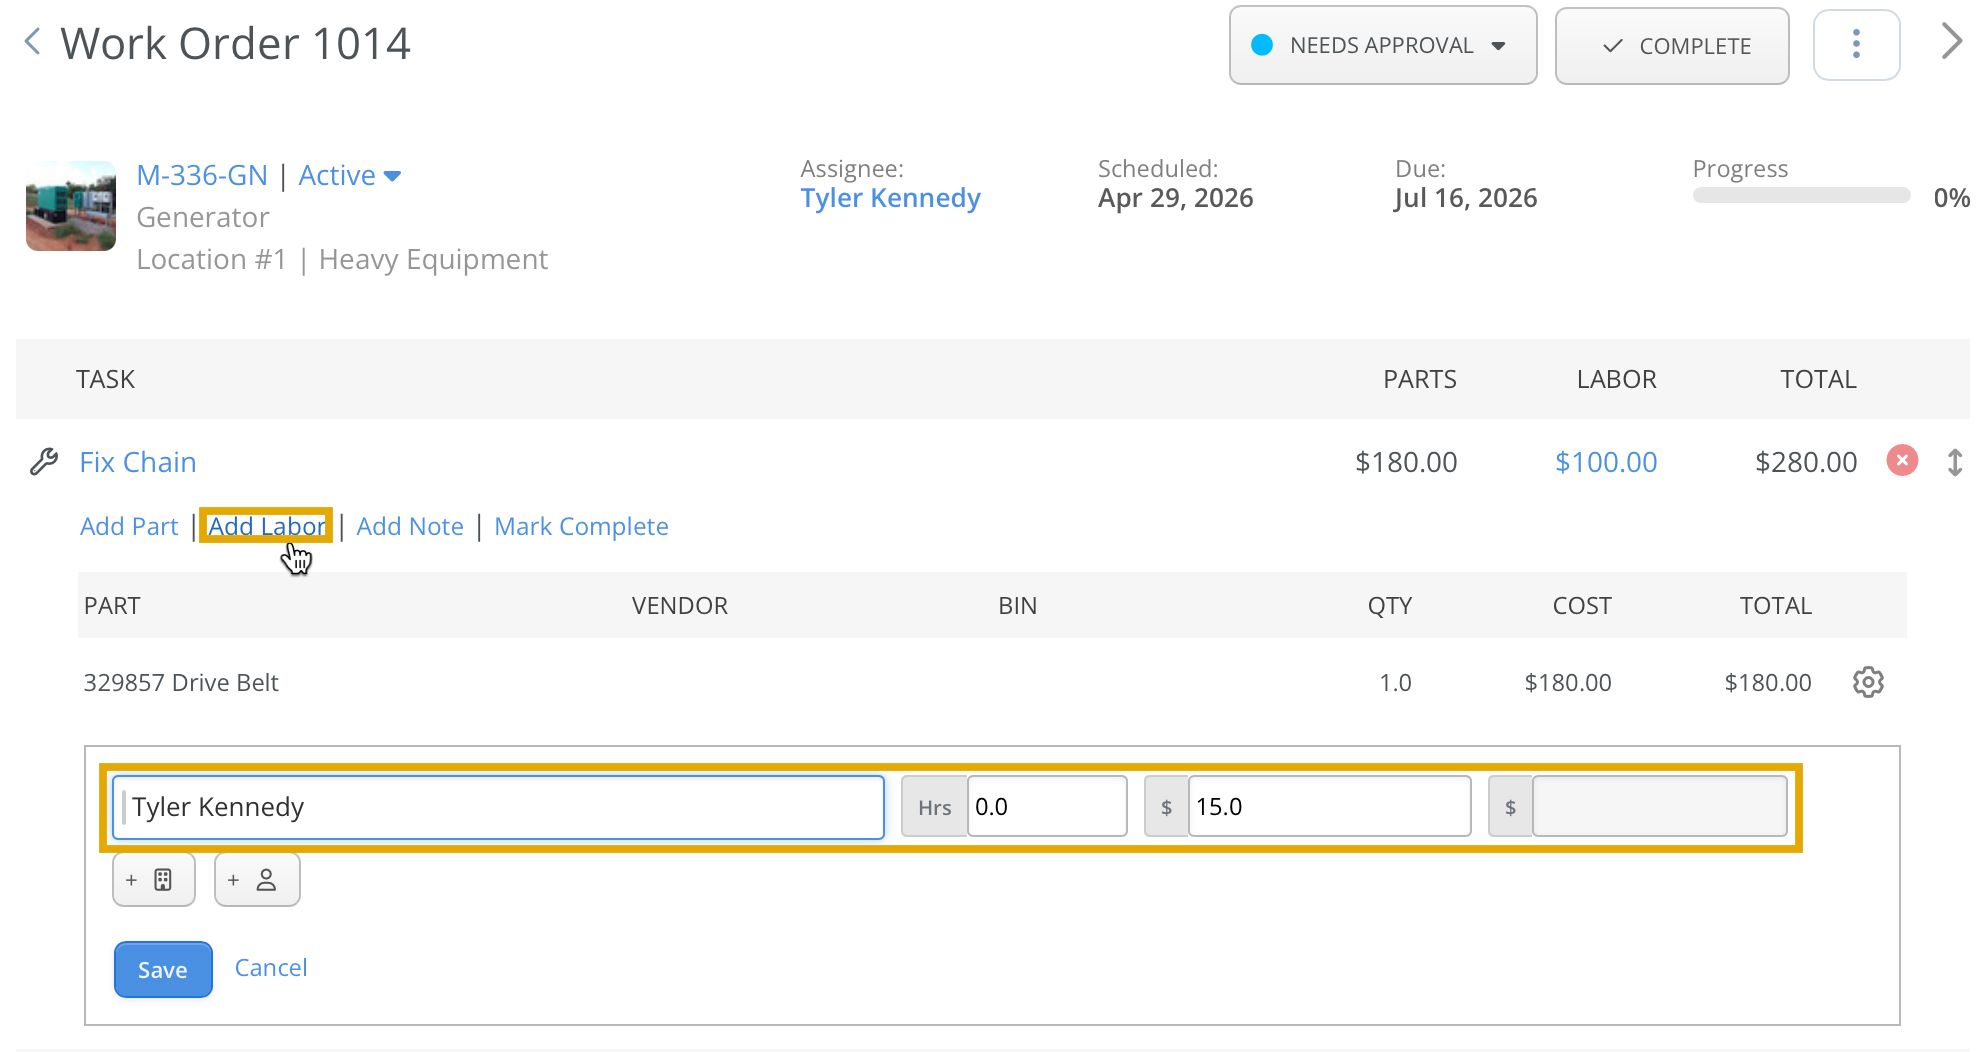
Once labor has been added to a task, the action menu located to the right of the labor entry provides options to edit or delete the record.

Add Costs To Tasks Without Itemizing Parts Or Labor
Part and labor costs can be applied to tasks without itemizing specific part numbers, labor hours, employees, or vendors. This approach is useful for recording general expenses, such as a miscellaneous shop cost, without creating detailed part or labor entries.
To use this option, the task must not already contain any associated parts or labor entries. The cost fields must remain active and displayed as blue, selectable links.
Labor costs are entered using the same process as part costs.

Edit Existing WO
Select Work Orders from the side menu to open the Work Order Index screen. From the index, select a Work Order number to open the corresponding Work Order record.
The Work Order Details screen is displayed, providing the ability to update the Work Order status, add additional tasks, or modify existing tasks.

Delete Task
If a task is added in error, it can be removed by selecting the red icon located to the right of the task row.

Edit WO Details
To edit WO information such as scheduled date, assignee's, type and priority, click the three dot icon on the top right and choose Edit.

This opens the Edit screen, where any necessary changes can be made. Once updates are complete, select Save at the bottom to apply the changes.

Complete WO

Review the Work Order contents to ensure all tasks and costs are accurate and fully accounted for. To close the Work Order, select the Complete button located in the upper-right corner of the screen.

A Close Work Order dialog box appears requesting the date and time of completion. If the equipment is configured with a meter (such as hours or mileage), an odometer reading is also required before the Work Order can be closed.

The status of the Work Order will be updated to Closed.

All tasks associated with the Work Order are marked as completed and are then displayed in the unit’s Maintenance History.
Reopening a Previously Completed Work Order
Once a Work Order has been closed, a Re-Open Work Order option becomes available on the Work Order record. This option allows the Work Order to be reopened at any time if additional updates or changes are required.

Partially Completing A Work Order
Selecting Mark Complete on an individual task will mark only that task as complete while leaving all other tasks open. This allows the overall progress of the Work Order to be accurately tracked as work is completed.

Once Mark Complete is selected for any task, the Work Order status will automatically update to In Progress in the upper-right corner. A green checkmark will appear next to the task name, indicating completion. If a task is marked complete in error, it can be reverted back to an incomplete status at any time.
The progress bar in the upper-right section of the Work Order screen will also update to reflect the number of tasks completed out of the total.

Print / Email WO
To print a Work Order, select the Gear icon located in the upper-left corner of the screen and choose Print.

A PDF version of the Work Order is generated upon selection. Depending on the internet browser being used, the file may either download automatically to the computer or open directly within the browser for viewing.
Selecting the download arrow in the upper-right corner will save the PDF locally. Once saved, the file can be attached and shared via email as needed.

A PDF of the Work Order can be emailed using the Gear icon. Selecting this option opens the default email client (such as Outlook or Thunderbird) with a new email draft, and the Work Order PDF is automatically attached.
